The pfsense DHCP server allows you to send configuration automatically to devices connected to your network. You have two ways to configure DHCP server in pfsense. To clarify, pfsense gives the ability to setup DHCP server in the web interface and on the console.
How to setup a DHCP Server in pfsense using web interface
Open a web browser, type the IP address of your pfsense firewall in the address bar, then press Enter.
Enter the username, password, and then select SIGN IN to connect to your pfsense firewall.
On the pfsense web page, click interfaces, and then select LAN (To configure the LAN interface).
Check enable interface.
Change IPv4 Configuration Type to Static IPv4.
In the static IPv4 Configuration section, add an IP address and a subnet mask.
IPv4 Address: 192.168.10.1
subnet mask: /24
Click on Save.
Click Apply Changes.
Go to Services, then select DHCP Server.
If you see the message “The DHCP Server requires a static IPv4 subnet large enough to serve addresses to clients. This system has no interfaces configured with a static IPv4 address”. Return to the interface, enable it, enter an IP address and a subnet mask.
In the general options section:
Check Enable DHCP Server on LAN interface
In range enter the IP address you want to be available on your DHCP Server.
Range:
From 192.168.10.100
To 192.168.10.199
If you need additional pools, then click on Add Pool.
When you are done, click on Save.
Click Apply changes.
To verify that the DHCP server is working, go to Status, then click DHCP Leases.
How to assign a consistent IP address to a DHCP client
Lots of situations can make you think about having a static IP address on your device. If you have a server on your network or any device you wish to access remotely, inevitably a static IP address must be configured to ensure accessibility after restarting the device.
Go to Services, then select DHCP Server.
On the Services DHCP page, scroll down to find the “DHCP Static Mappings for this Interface” section, and then click Add.
In MAC Address, enter the Mac address of the device to which you want to assign a static IP address.
In IP Address, enter the IP address you wish to use in the device. Something to note, the static IP address must be outside of the DHCP IP address range.
Enter a hostname in the hostname input box.
Give a description to help you remember the story behind the static IP address.
When you’re done, click Save.
Click Apply changes.
Video to show you how to configure DHCP server in pfsense
How to configure DHCP6 Server in pfsense using web interface
Before you can configure a DHCPv6 server in pfsense, you must setup a static IPv6 address on the interface you want to use.
Open a web browser, type the IP address of your pfsense, then press Enter to access the pfsense web interface.
Enter your pfsense username, password, and select SIGN IN.
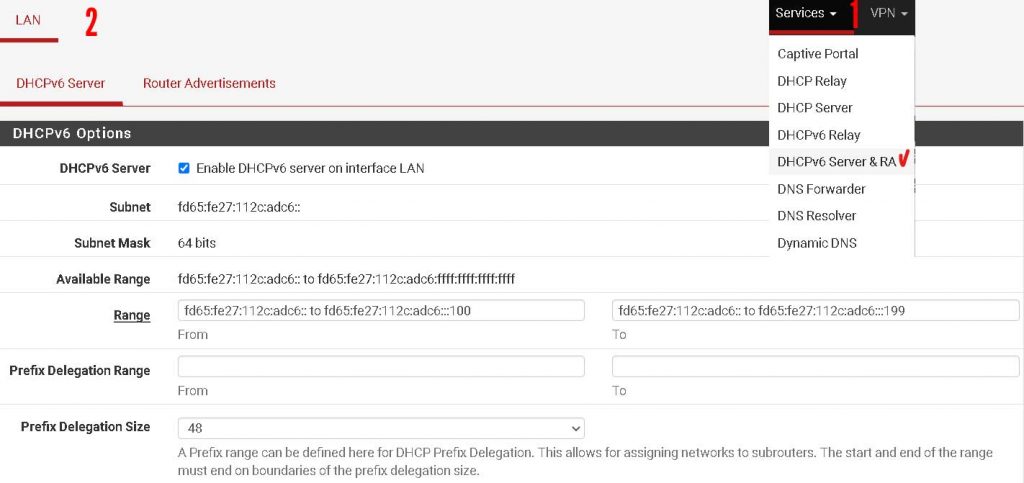
Go to Services, then select DHCPv6 Server & RA.
Note: If you don’t have any interface configured with IPv6, you will see a message like this “The DHCPv6 Server can only be enabled on interfaces configured with a static IPv6 address.” In this case, go to interfaces to configure and activate the interface you want to use. On this example, I will setup DHCPv6 Server on the LAN interface.
Select the interface LAN, then choose DHCPv6 Server.
In the DHCPv6 options section:
DHCPv6 Server: check Enable DHCPv6 server on interface LAN.
In range enter the IPv6 address you want to be available on your DHCPv6 Server.
Range:
From fd65:fe27:112c:adc6::100
To fd65:fe27:112c:adc6::199
When you’re done, click Save, and then click Apply Changes.
To verify that the DHCPv6 Server is running, go to Status, and then click DHCPv6 Leases.
What To Read Next
- How to create port aliases in pfsense
- Error 1020 access denied
- Access your computer from anywhere with vnc
- How to setup pfSense to use SSH key
If you like the content of this post or if it has been useful to you, please consider sharing it on your social media and follow me on Facebook and Twitter for more exclusive content.