One of the great things about the internet is the ability to talk and see family, friends and coworkers while you are away. Therefore, several video conferencing systems are available online, such as: Zoom, GoToMeeting, Microsoft Skype, Cisco Webex, TeamViewer, FaceTime Group, Microsoft Teams, etc. If you are not comfortable with the video conferencing systems mentioned above or if you have privacy concerns with them, I can tell you that you have a good alternative which is jitsi meet.
Jitsi meet is an open source video conference system that you can host on your own computer.
This post provides all the necessary steps to install jitsi meet server on Ubuntu server 18.04 operating system.
Update the list of packages, versions, and then upgrade the packages as needed.sudo apt update -y && sudo apt upgrade -y
Jitsi uses dependencies found in the repository universe. If you don’t have the universe repository in your Ubuntu Linux operating system, then add it to your system.sudo apt-add-repository universe
Use your favorite text editor to create the jitsi-stable.list file in the sources.list.d folder.sudo nano /etc/apt/sources.list.d/jitsi-stable.list
Add deb https://download.jitsi.org stable/ in the text file, then save it.
Download and add jitsi key in your Ubuntu server operating system
wget -qO - https://download.jitsi.org/jitsi-key.gpg.key | sudo apt-key add -
Install apt-transport-https to encrypt and to prevent data from being modified on routes without your knowledge.sudo apt-get install apt-transport-https
Now update the repository so that the system can add all packages.sudo apt update -y
Configure your firewall to allow traffic to ports: 80 tcp, 443 tcp and 10000 udp.sudo ufw allow 80/tcp
sudo ufw allow 443/tcp
sudo ufw allow 10000/udp
Install jitsi meet server and its dependencies
sudo apt-get -y install jitsi-meet
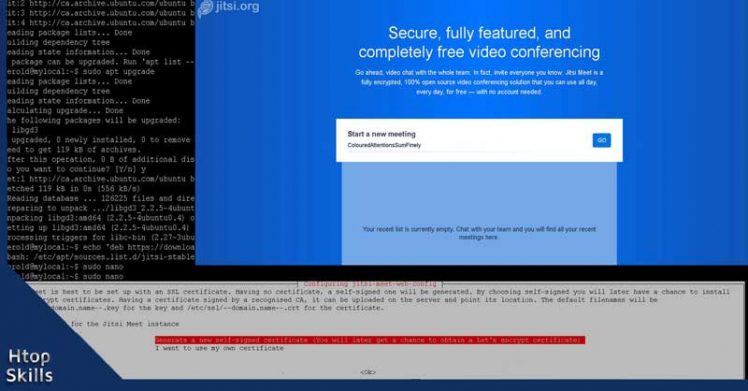
When you see the message “The hostname of the current installation: “, type your fully qualified domain name; But if you don’t have a domain name, you can use the hostname of the computer or the IP address.
In the next screen, select generate a new self-signed certificate, then click OK.
When the installation is complete, open your web browser, enter the address of your jitsi meet server, then press Enter.
How to install jitsi meet on Ubuntu 18.04
Change hostname after installation of jitsi meet
If after installing Jitsi meet you want to change the host name or replace it with a fully qualified domain name (fqdn), you can use dpkg-reconfigure to reconfigure the package that contains the hostname.sudo dpkg-reconfigure jitsi-videobridge2
How to change host name in jitsi meet
Repository error when updating Jitsi Meet
Get:5 https://download.jitsi.org stable/ InRelease [1,882 B]
Err:5 https://download.jitsi.org stable/ InRelease
The following signatures couldn’t be verified because the public key is not available: NO_PUBKEY B4D2D216F1FD7806
W: An error occurred during the signature verification. The repository is not up dated and the previous index files will be used. GPG error: https://download.jit si.org stable/ InRelease: The following signatures couldn’t be verified because the public key is not available: NO_PUBKEY B4D2D216F1FD7806
W: Failed to fetch https://download.jitsi.org/stable/InRelease The following signatures couldn’t be verified because the public key is not available: NO_PUBKEY B4D2D216F1FD7806
W: Some index files failed to download. They have been ignored, or old ones used instead.
To resolve this issue, type the command below and then press Enter after each one.
sudo rm /usr/share/keyrings/jitsi-keyring.gpgsudo curl https://download.jitsi.org/jitsi-key.gpg.key | sudo sh -c 'gpg --dearmor > /usr/share/keyrings/jitsi-keyring.gpg'sudo nano /etc/apt/sources.list.d/jitsi-stable.list
Delete everything in the jitsi-stable.list file, add deb [signed-by=/usr/share/keyrings/jitsi-keyring.gpg] https://download.jitsi.org stable/ in the file, then save it.
What To Read Next
- Play online Radio Station as Music on Hold in Asterisk
- Fix dns leak in Ubuntu
- How to set a specific country in a tor browser
- Xfinity connect to in home wifi to watch
If you like the content of this post or if it has been useful to you, please consider sharing it on your social media and follow me on Facebook and Twitter for more exclusive content.