When you want to share your computer internet connection with other devices, you can create a WIFI hotspot on your Windows 10 computer. Microsoft Windows integrated with support to create hotspot on Windows 10 without any third-party software.
How to set up a mobile hotspot in Windows 10
Click on Start and select Settings. Or
You can also access the Windows 10 settings app by pressing Windows and i keys at the same time.
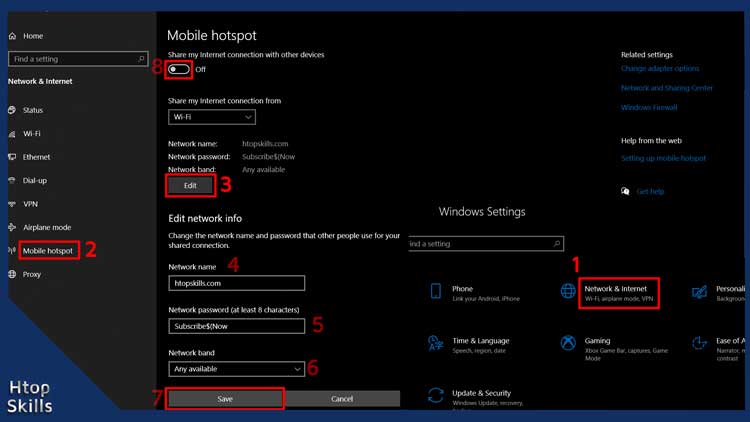
In the Windows 10 Settings window, click Network & Internet.
On the left side of the screen, select Mobile hotspot.
On the right side, choose the internet connection you want to share in the “Share my Internet connection from” section.
Click on edit.
In the Edit network info window, enter a new network name, password, choose any available in Network band, then click Save.
Now turn on the “Share my internet connection with device” switch. To connect a device to your new mobile hotspot, navigate to the WIFI settings on the device, select the network name, enter the password, then click connect.
How to connect to wifi on Windows 10
Go to the Network or Wi-Fi icon at the bottom right of the screen, then click on it.
Form the list of WIFI networks, select the WIFI you want to connect to, then click connect.
Enter the Wi-Fi password in the box that says ” Enter the network security key “.
When you are done, click Next.
Usually, this is all you need to connect to a wifi, but if there is more, follow the instructions until you are done.
Video to show you how to turn your computer into a hotspot on Windows 10
What To Read Next
- How to see WIFI password on Windows 10
- Xfinity connect to in home wifi to watch
- How to setup proxy on Windows 10
- Enable remote desktop on Windows 10
- How to find network shared folders on remote device
If you like the content of this post or if it has been useful to you, please consider sharing it on your social media and follow me on Facebook and Twitter for more exclusive content.