Proxy server is a good way to hide your online activities, access your home network or a corporate network. Fortunately, you don’t need any third-party software to be able to setup proxy on windows 10, as you can configure it right in the Settings app.
This post provides two methods to set up the proxy server settings in windows 10, namely automatic proxy configuration and manual proxy configuration.
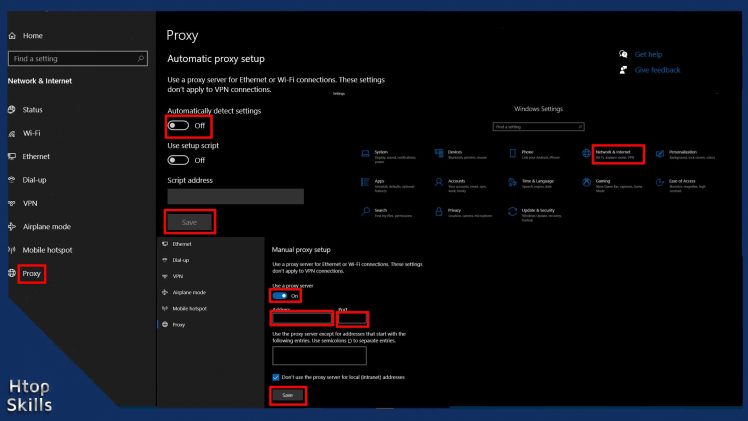
How to setup proxy on windows 10 using automatic proxy setup
Click on Start and select Settings or press Windows key + i to access the Settings app.
In the Windows Settings window, click Network & Internet.
On the left side, select Proxy.
Activate the “Automatically detect settings” switch
If you want to configure the proxy via script, turn on the “Use configuration script” switch, type the URL address of the script in the script address, then click Save.
To disable automatic proxy configuration, turn off the “Automatically detect settings” switch. And to remove the configuration script, turn off the “Use setup script” switch.
How to set up a proxy manually on Windows 10
Click on Start and select Settings or press Windows key + i to access the settings app.
In the Windows Settings window, click Network & Internet.
On the left side, select Proxy.
On the right side, turn on “Use a proxy server” switch.
Enter the proxy server IP Address, port number, then click Save.
Click the X at the top right to close the window.
To disable the proxy, turn off “Use a proxy server” switch.
Video to show you how to configure socks proxy in Chrome
What To Read Next
- How to set a specific country in a tor browser
- Xfinity connect to in home wifi to watch
- Unable to find the proxy server in tor browser
- Access RDP over the internet securely
- How to find network shared folders on remote device
If you like the content of this post or if it has been useful to you, please consider sharing it on your social media and follow me on Facebook and Twitter for more exclusive content.