Before you can use your new network card, you must assign the interfaces in pfsense firewall. The first thing you need to know before assigning interfaces in pfsense is the MAC address of the network card you want to add.
The MAC (Media Access Control) address is a unique set of characters that identifies a network interface card and facilitates communication at the physical layer. It is made up of six groups of characters and the first three groups of characters represent the manufacturer of the network card.
This post provides the necessary steps to assign interfaces in the pfsense firewall.
How to setup interface in pfsense
Go to interfaces, then click on assignments.
Now, identify the MAC address of the network interface card (NIC) you want to assign in pfsense.
If you have more than one network card available, you will see them in the drop-down menu next to Available networks ports.
Select the Mac address you want to use, then click Add.
Click on the network interface card (NIC) that you want to activate and configure.
Check the box enable interface
In the description, give the interface a name. For example: LAN, DMZ, WLAN, WIFI or other.
For your network card to work, you must tell the system how it will find the IP address (Internet Protocol address). In both IPv4 configuration type and IPv6 configuration type, you have several choices, but if you have DHCP service enabled, this is the way to go as it has many benefits and does not require any configuration.
In the IPv4 Configuration Type select DHCP and In the IPv6 Configuration Type select DHCP6.
These are the essential steps you need to add, activate, and configure a network card in pfsense.
When you are finish, click Save.
Click on apply changes.
How to assign interfaces from console in pfsense
On the pfsense console menu, type 1, then press Enter.
You will see all interfaces that pfsense can find drivers for them; And the system will display the message “Should VLANS be set up now [y:n]?”, type n (This configuration is not for VLANs), then press Enter.
The system will ask you to enter the WAN interface name. Your device must have at least one valid network card. Type the name of the interface you want to use as WAN interface, then press Enter.
The system will show you the message Enter the LAN interface name or ‘a’ for auto-detection
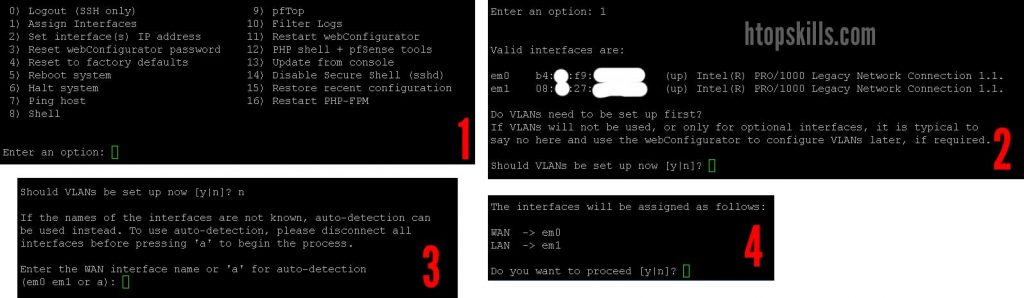
If you want to configure the LAN interface, type in the device name, then press Enter. Or if you don’t want to assign an interface for the LAN (Local Area Network), press Enter without typing anything.
It should be noted that when you assign the second interface, it will enable full firewall and NAT mode.
If you don’t have another interface that you want to assign, press Enter when you see the message “Enter the optional 1 interface name or ‘a’ for auto-detection”.
Check the interfaces that will be assigned on your pfsense system. To proceed press y, then press Enter.
When the process is complete, the system will return to the pfsense console menu.
Video to show you how to assign interfaces in pfsense
What To Read Next
- How to configure DHCP server in pfsense
- Error 1020 access denied
- Create port aliases in pfsense
- How to setup pfSense to use SSH key
If you like the content of this post or if it has been useful to you, please consider sharing it on your social media and follow me on Facebook and Twitter for more exclusive content.