Windows 10 makes it easy to add and change the drive letter of any of your hardware without using third-party software. Sometimes you might want to assign your devices or drives to a new letter because your app needs it to work well, your preferred drive letter was not available before, or other reasons.
This blog post provides steps to assign and change specific drive letter on hard drive partition, SD card, CD/DVD drive and external drive in Windows 10.
When you connect a device or media drive to your computer, Windows 10 assigns the next available letter to your SSD (Solid State Drive), USB device, Hard Disk Drive (HDD) partitions, or other internal and external device.
How to change drive letters in Windows 10
Right-click on Start, then select Disk Management. Or
Press the Windows key and R key at the same time to open run, type diskmgmt.msc, then press Enter.
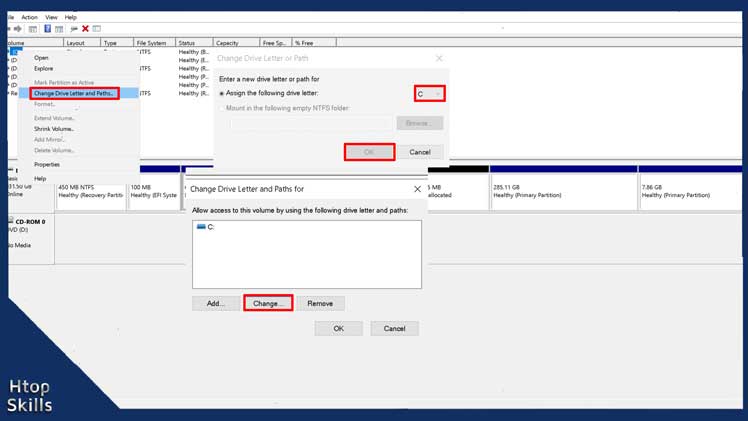
In the Disk Management window, right-click on the volume whose drive letter you want to change, then select Change drive letter and paths.
In the Change Drive Letter and Paths for… window, click change.
Make sure Assign the following drive letter is selected.
Choose the drive letter you want to use, and then click OK.
If Microsoft Windows shows you a confirmation message, click Yes.
Close the Disk Management window.
Go to This PC, in Devices and Drives, you should see the new drive letter assigned to your hardware.
How to assign a drive letter using Command Prompt
Go to the Windows 10 search bar, then type cmd.
Right-click on Command Prompt, then click Run as administrator to Run Windows Command Prompt as Administrator.
In the Command Prompt window, type the command below and then press Enter to open the diskpart command line utility.
diskpart
To find help in the diskpart utility, type the command below and then press Enter.
help
To list all the volumes available on your computer, type the command below and then press Enter.
list volume
Ltr contains the list of drive letters currently in use on your computer.
Select the volume whose drive letter you want to change. For example, to select volume 3, type the command below and then press Enter.
select volume 3
To assign the letter N to the selected volume, type the command below and then press Enter.
assign letter=N
Now every time you connect the device or drive to your computer, Windows 10 will assign it the selected drive letter.
How to change drive letter using PowerShell
Right click on Start, then select Windows PowerShell (Admin)
To see the list of partitions available on your computer, type the command below and then press Enter.
Get-Partition
To change the drive letter X to drive letter N, type the command below, then press Enter.
Get-Partition -DriveLetter X | Set-Partition -NewDriveLetter NReplace X with your current drive letter you want to change and N with the new drive letter you want to set.
Note:
- To change the drive letter of a CD / DVD optical disc drive, you must insert a disc into it.
- To avoid any problem with your software installed on your Windows 10 computer, it is good practice not to change the letter of your drive to A, B, C and D.
- Drive letter A and B were reserved for floppy disks in some older versions of Microsoft Windows.
- Drive letter C is usually for Windows boot partition and system files.
- D is the default Drive letter for CD (Compact Disc) and DVD (Digital Video Disc) optical disc drive.
What To Read Next
- How to change your cursor on Windows 10
- How To Install Printer On Windows 10
- Fix Windows 10 Cannot Update
- How to find the MAC address of a device
- How to forget wifi network on Windows 10
If you like the content of this post or if it has been useful to you, please consider sharing it on your social media and follow me on Facebook and Twitter for more exclusive content.